
Chocolate French Silk Pie Recipe
Introduction
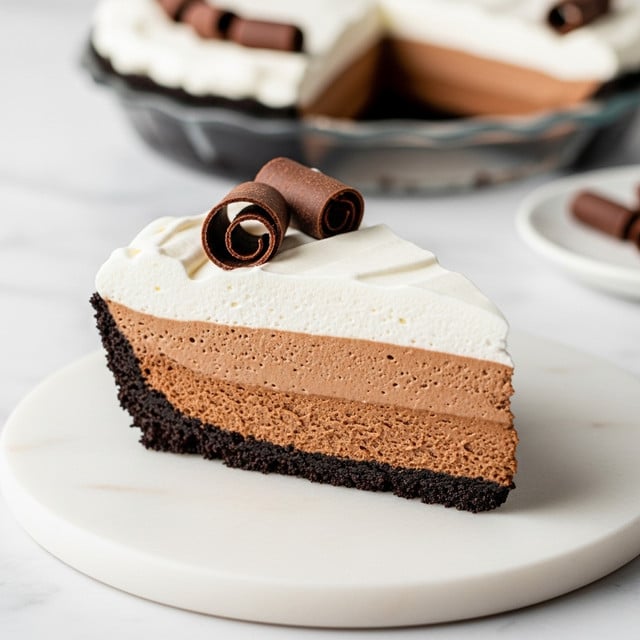
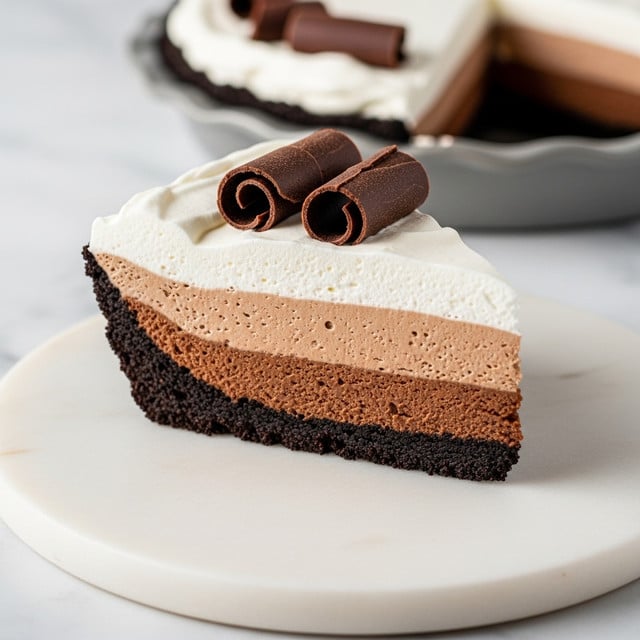
Chocolate French Silk Pie is a rich, velvety dessert perfect for chocoholics. With a crunchy Oreo crust and a luscious chocolate filling topped with homemade whipped cream, this pie is sure to impress at any gathering.
Ingredients
- 25 Oreo cookies (do not remove the cream filling)
- 4 tablespoons salted butter (melted)
- 1 1/2 cups heavy whipping cream (divided)
- 4 large eggs (room temperature)
- 3/4 cup granulated sugar
- 1/2 teaspoon salt
- 8 oz semi-sweet baking chocolate (chopped fine)
- 2 teaspoons vanilla extract
- 1 teaspoon espresso powder (optional)
- 12 tablespoons salted butter (cubed, room temperature)
- 1/4 cup powdered sugar
- 1 teaspoon vanilla extract
- 1/4 teaspoon cream of tartar
- Chocolate curls or shavings (optional topping)
Instructions
- Step 1: Preheat the oven to 350ºF. Place the Oreo cookies in a food processor and pulse until you get fine crumbs. Add the melted butter and pulse again until the mixture resembles wet sand.
- Step 2: Press the crumb mixture evenly into the bottom and up the sides of a 9-inch deep pie plate. Bake for 10 to 12 minutes. Remove from oven and let cool completely.
- Step 3: Using a hand mixer, whip 1 1/2 cups heavy cream in a medium bowl until stiff peaks form (about 3–4 minutes). Cover and refrigerate for later use.
- Step 4: Fill a saucepan with 3 inches of water and bring to a simmer. In a heat-proof bowl, whisk the eggs, sugar, and salt until pale yellow.
- Step 5: Place the bowl over the simmering water (double boiler style), ensuring the bottom doesn’t touch the water. Whisk vigorously until the mixture reaches 160ºF or thickens and coats the back of a spoon (about 10–12 minutes). Remove from heat and cool for 5 minutes, whisking continuously to prevent solidifying.
- Step 6: Melt the chopped chocolate in a microwave-safe bowl in 20-second intervals, stirring until smooth. Avoid overheating to prevent graininess.
- Step 7: Whisk the melted chocolate, vanilla extract, and espresso powder into the egg mixture until combined. Let cool for 10 minutes.
- Step 8: Beat the 12 tablespoons of cubed butter in a stand mixer on medium speed until smooth and creamy (2–3 minutes), scraping the bowl occasionally.
- Step 9: With the mixer on low, gradually add the cooled egg and chocolate mixture. Once combined, increase the speed to medium-high and whip for 4–5 minutes until light and fluffy.
- Step 10: Gently fold in the chilled whipped cream in two batches. Pour the filling into the cooled crust, cover tightly with plastic wrap, and refrigerate until firm, at least 6 hours or up to 48 hours.
- Step 11: Just before serving, whip the remaining 1 1/2 cups heavy cream in a medium bowl until thickened. Add powdered sugar, vanilla extract, and cream of tartar. Continue whipping until medium-stiff peaks form.
- Step 12: Spoon or pipe the whipped cream topping over the pie. Garnish with chocolate curls or shavings if desired. For clean slices, use a sharp knife dipped in hot water and dried before each cut. Enjoy!
Tips & Variations
- Use espresso powder to enhance the chocolate flavor, or omit for a milder taste.
- For a nutty twist, sprinkle toasted chopped nuts on top before serving.
- If you don’t have a thermometer, watch for the egg mixture to become foamy and coat the back of a spoon as a visual cue.
- Try using dark chocolate for a richer, more intense pie.
Storage
Store the pie covered in the refrigerator for up to 2 days for the best texture and flavor. The crust can soften over time, so consuming it within this period is ideal. Reheat slices gently at room temperature for 10–15 minutes before serving to soften the filling slightly, but avoid microwave reheating as it can change the texture.
How to Serve
Serve this delicious recipe with your favorite sides.
FAQs
Can I use regular chocolate chips instead of baking chocolate?
Yes, you can substitute semi-sweet chocolate chips for baking chocolate. Chop them finely to ensure they melt smoothly and evenly in your mixture.
Is it safe to use raw eggs in this recipe?
This recipe heats the eggs gently over simmering water until they reach 160ºF, which reduces the risk by cooking them enough to be safe while keeping the texture smooth. Make sure to use fresh, high-quality eggs and follow the cooking step carefully.
Print
Chocolate French Silk Pie Recipe
- Total Time: 6 hours 37 minutes
- Yield: 10 servings 1x
- Diet: Vegetarian
Description
Indulge in a luscious Chocolate French Silk Pie featuring a crunchy Oreo crust and a rich, silky chocolate filling. This classic no-bake pie is topped with fluffy whipped cream and optional chocolate curls for an elegant finish. Perfect for special occasions or decadent dessert lovers, it requires chilling for a smooth, creamy texture.
Ingredients
Crust
- 25 Oreo cookies (do not remove the cream filling)
- 4 tablespoons salted butter, melted
Filling
- 1 1/2 cups heavy whipping cream
- 4 large eggs, room temperature
- 3/4 cup granulated sugar
- 1/2 teaspoon salt
- 8 oz semi-sweet baking chocolate, chopped fine
- 2 teaspoons vanilla extract
- 1 teaspoon espresso powder (optional)
- 12 tablespoons salted butter, cubed and room temperature
Topping
- 1 1/2 cups heavy whipping cream
- 1/4 cup powdered sugar
- 1 teaspoon vanilla extract
- 1/4 teaspoon cream of tartar
- Chocolate curls or shavings (optional topping)
Instructions
- Prepare the Crust: Preheat the oven to 350ºF. Place the Oreo cookies in a food processor and pulse until fine crumbs form. Add the melted butter and pulse again until the mixture resembles wet sand.
- Bake the Crust: Press the crumb mixture firmly into the bottom and up the sides of a 9-inch deep pie plate. Bake for 10 to 12 minutes, then remove and let cool completely.
- Whip the Cream for Filling: In a medium bowl, whip 1 1/2 cups heavy cream until stiff peaks form (about 3-4 minutes). Cover and refrigerate for later use.
- Prepare the Egg Mixture: Fill a medium saucepan with 3 inches of water and bring to a simmer. In a heatproof bowl, whisk together eggs, sugar, and salt until pale yellow.
- Cook the Egg Mixture: Place the bowl over the simmering water without touching the water. Whisk vigorously until the mixture reaches 160ºF (about 10-12 minutes), thickens, and coats the back of a spoon. Remove from heat and cool for 5 minutes while whisking constantly to avoid curdling.
- Melt the Chocolate: In a small heatproof bowl, melt the chopped chocolate in the microwave in 20-second intervals, stirring between each until smooth. Avoid overheating.
- Combine Chocolate and Egg Mixture: Whisk melted chocolate, vanilla extract, and espresso powder into the egg mixture until combined. Let cool for 10 minutes.
- Beat the Butter: Using a stand mixer with paddle attachment at medium speed, beat the room temperature butter for 2-3 minutes until smooth and creamy. Scrape the bowl as needed.
- Incorporate Chocolate Mixture into Butter: Slowly add the cooled egg and chocolate mixture to the butter on low speed, scraping the bowl to combine fully. Then increase speed to medium-high and whip until light and fluffy, about 4-5 minutes.
- Fold in Whipped Cream: Gently fold the chilled whipped cream into the chocolate mixture in two batches to maintain the airy texture.
- Assemble and Chill the Pie: Pour the filling into the cooled crust. Cover tightly with plastic wrap and refrigerate until firm, at least 6 hours or up to 48 hours.
- Make the Whipped Cream Topping: Just before serving, whip 1 1/2 cups heavy cream until thickened. Add powdered sugar, vanilla extract, and cream of tartar, then continue whipping until medium-stiff peaks form.
- Decorate and Serve: Spoon or pipe the whipped cream topping on the pie. Garnish with chocolate curls or shavings if desired. For clean slices, use a sharp knife dipped in hot water and dried before each cut. Enjoy!
Notes
- Ensure eggs reach 160ºF to eliminate any risk from raw eggs.
- Room temperature eggs and butter ensure a smoother filling texture.
- Do not overheat chocolate to prevent grainy texture.
- The espresso powder is optional but enhances chocolate flavor.
- Chilling the pie for at least 6 hours is essential for the filling to set properly.
- Use a sharp knife warmed in hot water for clean pie slices.
- You can prepare the pie up to 2 days in advance for convenience.
- Prep Time: 25 minutes
- Cook Time: 12 minutes
- Category: Dessert
- Method: Baking
- Cuisine: American
Keywords: Chocolate French Silk Pie, Oreo crust, no-bake chocolate pie, creamy chocolate filling, whipped cream topping, classic dessert


