
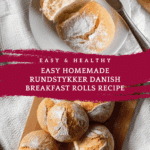
Rundstykker (Danish Breakfast Rolls) Recipe
Introduction
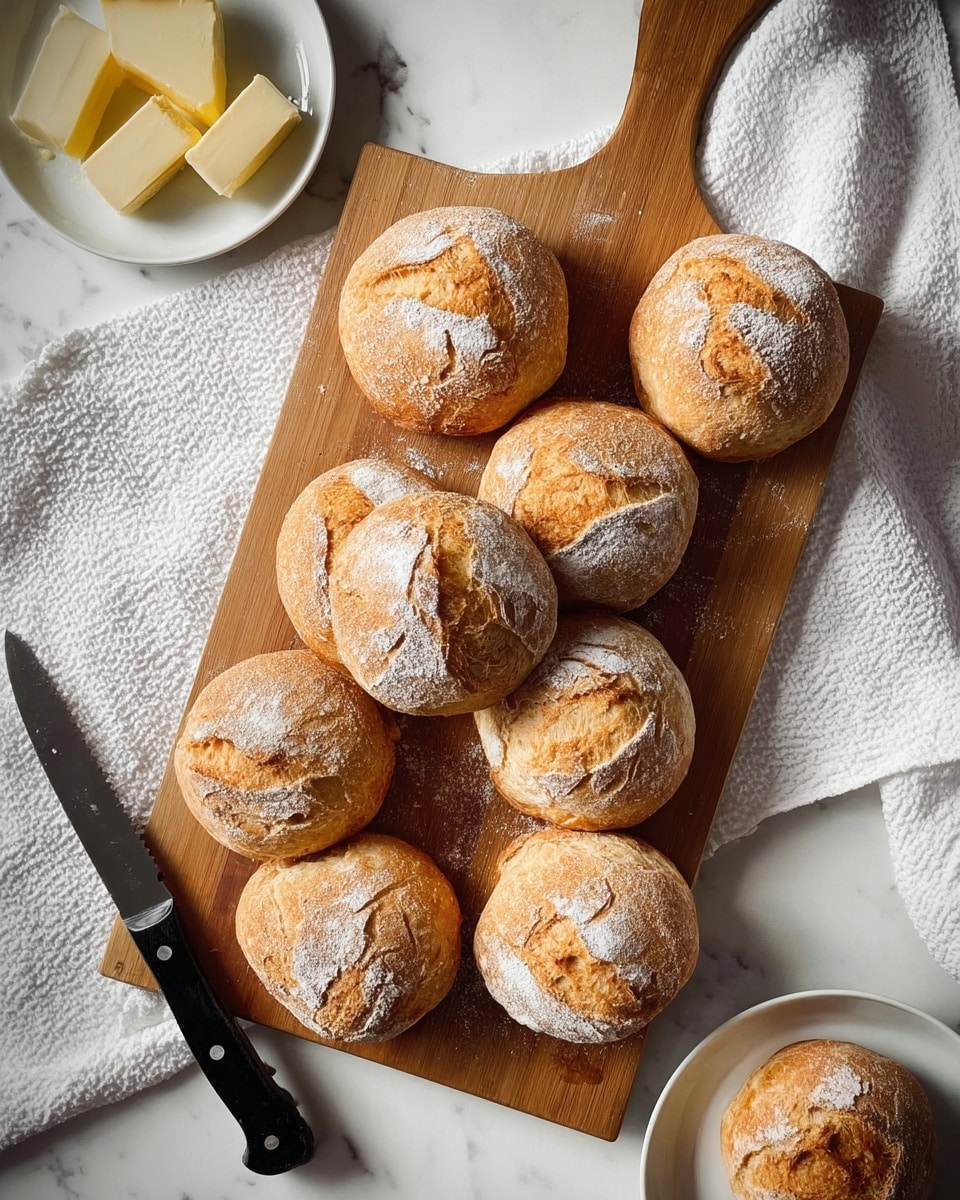
Rundstykker are traditional Danish breakfast rolls known for their light, airy crumb and crisp crust. These rustic rolls are simple to make and perfect for a cozy morning at home.
Ingredients
- 2 tsp instant yeast (or 2.25 tsp active dry yeast, or 17.5g fresh yeast)
- 500 ml (2 cups) warm water
- 1 tbsp sugar
- 2 tsp salt
- 100 grams (about 3/4 cup) whole wheat flour
- 500 grams (about 4 cups) bread flour or all-purpose flour
Instructions
- Step 1: Combine the yeast and warm water in a large bowl. If using active dry yeast, let it sit for 5–10 minutes until bubbly. If using instant yeast, you can skip this waiting and mix immediately.
- Step 2: Add sugar, salt, whole wheat flour, and bread flour to the yeast mixture. Stir until a rough dough forms and most flour is hydrated.
- Step 3: Cover the bowl and let the dough rise in a warm place for 30 minutes.
- Step 4: Perform a stretch and fold: with damp hands, pull the dough edges inward and fold. Cover and let rise for another 30 minutes.
- Step 5: Repeat the stretch and fold, then allow the dough to rise for 15 more minutes.
- Step 6: Lightly flour your work surface and turn out the dough. Divide into 12 equal pieces. Shape each by folding the sides into the middle, pinching seams to create tension. Place seam-side down on a parchment-lined baking sheet.
- Step 7: Cover the rolls with a towel or cling film and chill in the fridge for 10–20 minutes while preheating the oven.
- Step 8: Preheat the oven to 450°F (230°C). Place a metal or cast iron tray on the bottom rack and bring 1–2 cups of water to a boil on the stove.
- Step 9: Remove rolls from the fridge. Dust tops with flour evenly using your hands.
- Step 10: Wet a sharp knife blade with water and score each roll with a cross on top.
- Step 11: Carefully pour the boiling water into the heated tray in the oven to create steam. Immediately place the baking sheet with rolls on the rack above and close the oven. Bake for about 15 minutes, checking that the bottoms are browned and rolls sound hollow when tapped.
- Step 12: Remove from oven and cool for at least 10–15 minutes before slicing and serving.
Tips & Variations
- Use a serrated knife or razor blade for cleaner, sharper scores on the rolls.
- Substitute bread flour with all-purpose flour for a softer crumb, though bread flour gives better structure.
- For extra flavor, try adding 1 tsp of dried herbs such as rosemary or thyme to the dough.
- Instead of chilling, let the rolls proof at room temperature for 30–45 minutes if short on time.
- Ensure your hands are just damp (not wet) during stretch and folds to prevent sticking.
Storage
Store leftover rundstykker in an airtight container or wrapped tightly in plastic at room temperature for up to 2 days. For longer storage, freeze the rolls in a sealed bag for up to 1 month. To reheat, thaw if frozen and warm in a 350°F (175°C) oven for about 5–8 minutes to refresh the crust.
How to Serve

Serve this delicious recipe with your favorite sides.
FAQs
Can I use active dry yeast instead of instant yeast?
Yes, you can substitute active dry yeast but allow it to proof in warm water with a bit of sugar for 5–10 minutes before mixing with other ingredients.
Why do I need to steam the rolls while baking?
Steaming creates a humid environment that prevents the crust from hardening too quickly and helps develop a crisp, shiny crust typical of bakery rolls.
Print
Rundstykker (Danish Breakfast Rolls) Recipe
- Total Time: 1 hour 50 minutes
- Yield: 12 rolls 1x
- Diet: Vegetarian
Description
Rundstykker are traditional Danish breakfast rolls that are soft on the inside with a slightly crusty exterior. These rolls are made with a combination of whole wheat and bread flour, gently kneaded using a stretch and fold technique for a tender crumb. Perfect when enjoyed fresh with butter and jam, these rolls bring the comforting taste of Denmark to your breakfast table.
Ingredients
Dough Ingredients
- 2 tsp instant yeast (or 2.25 tsp active dry yeast or 17.5g fresh yeast)
- 500 ml (2 cups) warm water
- 1 tbsp sugar
- 2 tsp salt
- 100 grams (about 3/4 cup) whole wheat flour
- 500 grams (about 4 cups) bread flour or all-purpose flour
Instructions
- Activate Yeast: Combine the yeast and warm water in a large bowl. If using active dry yeast, let the mixture sit for 5-10 minutes until bubbles form. Instant yeast can be mixed directly without waiting.
- Mix Dough: Add sugar, salt, whole wheat flour, and bread flour to the yeast mixture. Stir until you get a rough dough and most dry spots are moistened.
- First Rise: Cover the bowl and place it in a warm spot to rise for 30 minutes.
- First Stretch and Fold: With damp hands, pull the sides of the dough upwards and fold them towards the center. Let the dough rise for another 30 minutes.
- Second Stretch and Fold: Repeat the stretch and fold process. Then allow the dough to rise for an additional 15 minutes.
- Shape Rolls: Lightly flour your work surface and tip the dough onto it. Divide into 12 equal pieces. For each piece, pull sides into the middle and pinch seams together 2-3 times for surface tension. Flip rolls seam side down and place on a parchment-lined baking sheet. Pop any large air bubbles.
- Chill Rolls: Cover rolls with a towel or cling film and refrigerate for 10-20 minutes while preheating the oven.
- Preheat Oven and Prepare Steam: Preheat oven to 450°F (230°C). Place a metal or cast iron pan on the bottom rack. Boil 1-2 cups of water on the stove.
- Dust and Score: Remove rolls from fridge and dust tops evenly with flour. Wet a sharp knife or razor blade and score a cross on top of each roll.
- Add Steam and Bake: Carefully pour the boiling water into the preheated pan in the oven. Quickly place the baking sheet with rolls on the rack above and close the oven door immediately. Bake for about 15 minutes until rolls are browned and sound hollow when tapped.
- Cool: Remove rolls from oven and let them cool for 10-15 minutes before slicing and serving.
Notes
- Using instant yeast allows skipping the activation step, but warm water helps yeast activate faster.
- The stretch and fold technique replaces kneading to gently develop gluten and improve dough texture.
- Steam in the oven creates a crusty exterior characteristic of traditional Danish rolls.
- Flour dusting and scoring allow for expansion during baking and an attractive finish.
- Rolling dough pieces with proper tension ensures nicely shaped, fluffy rolls.
- Cool rolls completely before slicing to avoid gummy texture inside.
- Prep Time: 15 minutes
- Cook Time: 15 minutes
- Category: Bread
- Method: Baking
- Cuisine: Danish
Keywords: Danish breakfast rolls, Rundstykker, bread rolls, stretch and fold bread, homemade bread rolls, Scandinavian bread

